
Do you have an outdated tile wall or tiled surface in your home that no longer fits your style, but the idea of tile removal sounds messy, expensive, and time-consuming?
If you’re researching how to update tile without removing it, you’re not alone. Many homeowners want a cost-effective, DIY-friendly way to refresh wall tiles without demolition.
The good news? You can put wall panels over tiles—and faux stone panels and faux brick panels are one of the most durable, realistic, and easy-to-install options available.
Can You Put Wall Panels Over Tiles?
Yes, it really is that simple. You can install wall panels over tiles in many areas of your home as long as the tiled surface is flat, secure, and in good condition.
Using construction-grade adhesive, wall panels can be applied directly over existing ceramic tile or other wall tiles, eliminating the need for demolition while saving time and labor costs.
This approach is especially popular for homeowners looking for:
- A cost-effective renovation
- A cleaner alternative to tile removal
- A DIY project that delivers dramatic results
Important note: Wall panels require at least 85% surface contact for proper installation. Uneven or highly textured tile may need to be sanded down or removed before wall panel installation.
How to Update Tile Without Removing It: Panel Options to Consider
When researching how to update tile without removing it, most homeowners come across a few paneling options. Here’s how they compare.
Faux Stone & Faux Brick Wall Panels
Faux stone and brick wall panels are designed specifically to install over existing surfaces like tile walls.
Why they work so well over tile:
- Lightweight and easy to handle
- Designed for adhesive-only panel installation
- Easy to clean and low maintenance
- Realistic texture and depth modeled from natural materials
Made from high-density polyurethane, faux panels won’t crack, split, or fade over time, so they’re a long-lasting solution.
What About Natural Wood Paneling Over Tiles?
Natural wood paneling can add warmth to a space and is sometimes used to cover tile in dry, low-traffic areas. For spaces that require durability and easy maintenance, faux stone and brick panels often provide a longer-lasting solution.
Wood-style panels can work in some situations, but they come with limitations:
- Less moisture resistant than faux stone or brick
- Not ideal for wet areas like bathrooms
- Can warp or swell over time
- Often requires more surface prep
Because of this, faux stone and brick panels are typically the better-performing option, especially for tile walls.
(AZ Faux specializes in faux stone and brick panels, which are engineered for durability and ease of installation.)
Faux Wall Panels vs. Real Stone and Brick
Faux wall panels are cast from molds of real stone and brick, giving them the same visual depth and texture without the weight or installation complexity.
Compared to real stone or brick:
- Easier to install
- More affordable to ship and install
- DIY-friendly
- No structural reinforcement required
This makes faux panels an ideal solution when installing wall panels over tiles.
5 Design Ideas for Using Wall Panels Over Tile
You don’t need to reimagine your entire space to make a big impact. These examples highlight how wall panels can transform tile walls and inspire new design possibilities.
Elevate a Kitchen Coffee Bar With Faux Stone
Give a kitchen coffee bar a refined upgrade without the mess of tile removal by using faux stone wall panels as a backsplash-style accent. In this space, Asheville Block Faux Stone Wall Panels in Stone Gray add depth and subtle texture while maintaining a clean, balanced look that pairs seamlessly with the cabinetry and countertops. Installed directly over the existing wall surface, the panels deliver the appearance of solid masonry while remaining easy to install and durable.
 Asheville Block Faux Stone Wall Panels in Stone Gray
Brighten an Open-Concept Kitchen With White Brick
This open-concept kitchen and dining space shows how a tiled wall can be transformed without demolition using Old Medford Faux Brick Wall Panels in Dove White. The soft white brick finish brightens the room while adding subtle texture, creating a timeless backdrop that pairs beautifully with natural wood accents and neutral tones.
 Old Medford Faux Brick Wall Panels in Dove White
Upgrade an Outdoor Kitchen or Bar
Outdoor kitchens and bar surrounds can be refreshed using Sedona Dry Stack Faux Stone Wall Panels in Cambridge Gray. The rugged stone profile adds depth and natural texture while holding up to outdoor conditions. It’s a practical choice for patios, outdoor kitchens, and entertaining spaces. When paired with stainless steel appliances and stone-look flooring, the panels help create a cohesive, high-end finish that blends seamlessly with the surrounding space.
 Sedona Dry Stack Faux Stone Wall Panels in Cambridge Gray
Add a Soft, Contemporary Brick Accent Wall
This contemporary living space features Contemporary Brick Faux Wall Panels in Blush Currant, creating a warm, modern accent wall with subtle color variation and clean lines. The soft blush-toned brick adds depth and visual interest while maintaining a refined, minimalist feel, making it an ideal choice for feature walls in living rooms, offices, or dining spaces where texture is desired without overwhelming the room.
 Contemporary Brick Faux Wall Panels in Blush Currant
Bring Natural Texture to Bathroom Tile Walls
In this bathroom, an outdated tile wall has been updated using Old Medford Faux Brick Wall Panels in Whitewash Brick installed directly over the existing tile. The soft, weathered brick finish adds texture and character while maintaining a clean, bright look that works beautifully in wet areas like bathrooms. Paired with dark cabinetry and light countertops, the faux brick panels create contrast and warmth without sacrificing durability or easy maintenance.
 Old Medford Faux Brick Wall Panels in Whitewash Brick
Pro Tips for Fitting Wall Panels Over Tile
Before starting your installation, keep these tips in mind:
- Allow panels to acclimate in the installation area for at least 24 hours
- Adhesive bonds especially well along grout lines
- Lightly roughing tile with fine-grit sandpaper improves adhesion
- Reuse trimmed panels when possible to reduce waste
- Always check tile integrity before installing panels
How To Install Faux Panels Over Tile
Below is a high-level overview of the installation process. Always follow AZ Faux’s detailed adhesive-only instructions when installing.
Before getting started, watch this installation overview video to see how faux stone and brick panels are installed over tile. The video walks through key steps and best practices to help you feel confident before beginning your project.
When you’re ready, follow the detailed steps below for a successful installation.
Tools & Materials
|
|
Panel Orientation & Layout
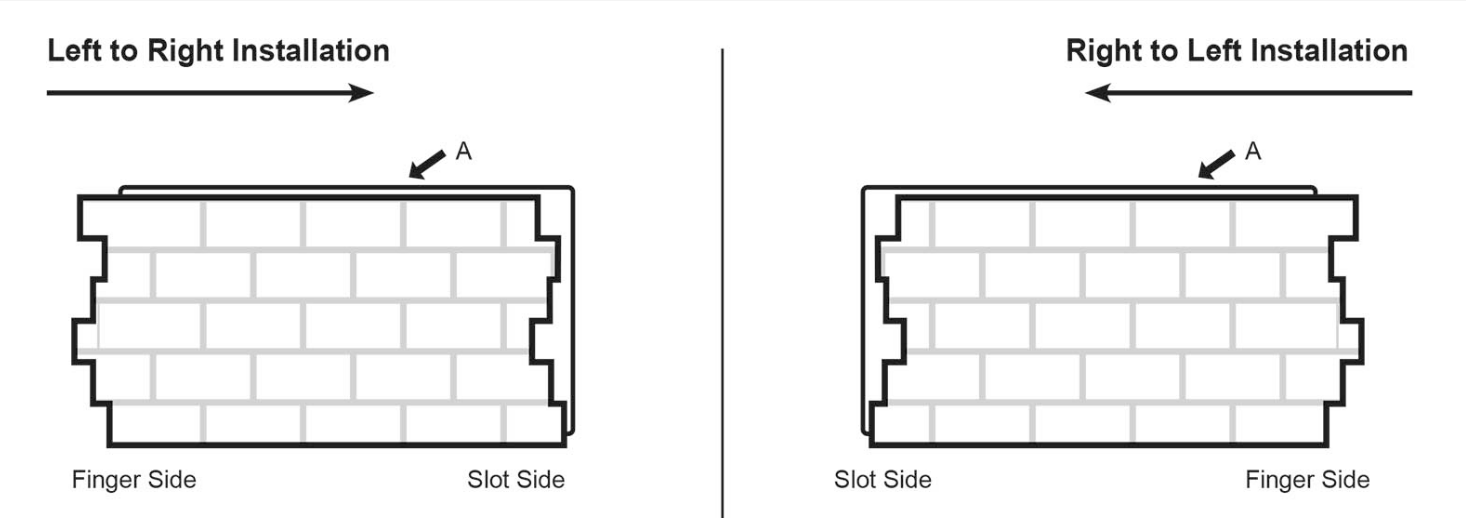
Before installation, identify the orientation of your panels.
Lay one panel flat with the flat lip on the long side facing up:
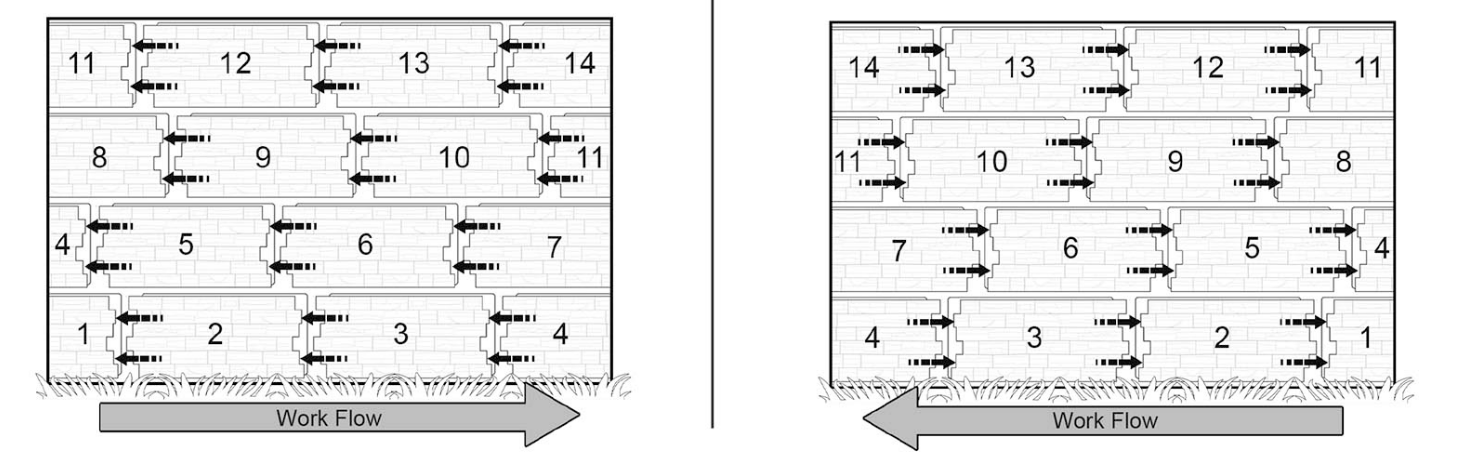
- If the panel fingers project to the left, installation will run left to right
- If the fingers project to the right, installation will run right to left
This determines the direction of your entire installation.
Step-by-Step Installation Overview
The steps below provide a general overview of the installation process.
Step 1: Orient Your Panels & Plan Installation Order
Just like real stone or brick, variation is key to achieving a realistic look.
- Lay panels out on the floor before installing
- Mix panels so colors and textures vary naturally
- If panels are stamped “A” and “B,” alternate between them during installation
This planning step helps prevent repeating patterns on your tile wall.
Step 2: Prepare Your Tile Surface
Check the tiled surface to ensure it is solid and structurally sound.
- Clean the tile wall and backs of panels with a clean cloth
- Remove dust and debris so adhesive bonds properly
Panels adhere best to clean, dry surfaces.
Step 3: Trim Your First Panel
If you are installing interlocking corners, you may skip this step.
- Mark the panel where it needs to be trimmed
- Using a wood cutting saw with a finish blade, trim at least ¼” off the panel to reduce waste
Step 4: Draw a Level Line
Find the high point of the floor using a level.
- Hold a full-size panel against the wall
- Mark the height
- Extend a level line across the length of the wall
This line will help keep panels level throughout installation.
Step 5: Apply Adhesive to the Panel
Using a construction adhesive and applicator gun:
- Apply adhesive in vertical lines on the back of the panel
- Start about 2” from the edge
- Space adhesive lines every 6”
- Add a dab of adhesive to the back of each panel finger
Step 6: Adhere the Panel to the Tile
Press the panel firmly onto the tile wall using a slight twisting motion.
- Align it with the level line
- Ensure it is plumb and flush with the wall edge
Step 7: Add Adhesive & Caulk
- Apply adhesive to the panel lip about 1 inch from the face
- Apply a bead of color-coordinated textured caulk where the panel face meets the lip
- Remove excess adhesive or caulk with a damp cloth
Caulking during installation protects against moisture and improves realism.
Step 8: Repeat Panel Installation
- Fit panels tightly together
- Continue following your level line
- Trim panels as needed
- The final panel in each row will be trimmed on the finger side
Step 9: Start the Next Row
Begin the next row directly above the first installed panel.
- Trim the first panel so the seams are offset
- Apply adhesive to the top lip of the panel below
- Fit panels tightly for a secure bond
Step 10: Touch Up as Needed
Once installation is complete:
- Seal joints where panels meet adjacent surfaces with caulk
- Use the touch-up kit to blend seams and cut edges:
- Apply base coat (if included) with a cotton swab
- Apply coordinating paint and dab with a soft cloth
- Apply wash (if included) and blend
A Smarter Way to Update Tile
 Lexington Dry Stack Faux Stone Wall Panels in Lead
If you’ve been searching for how to update tile without removing it, wall panels offer a practical, attractive solution.
While natural wood paneling over tiles is sometimes considered, faux stone and brick panels deliver better durability, moisture resistance, and long-term performance.
Ready to transform your tile wall without demolition?
Need more inspiration?