
This guide walks you through how to install faux wood beams on a vaulted ceiling, from planning your layout to completing installation. You’ll also learn why adding beams can enhance vaulted spaces, how to choose the right spacing, and what to expect when it comes to maintenance and cost.
Table of Contents
- Why Add Faux Beams to a Vaulted Ceiling
- Vaulted Ceiling Beam Design Ideas
- How to Install Faux Wood Beams on a Vaulted Ceiling: Step-by-Step Guide
- Caring for Your Vaulted Ceiling Beams
- Frequently Asked Questions
- Start Your Vaulted Ceiling Beam Design
Vaulted ceilings can completely transform the look and feel of your home, adding height, light, and a sense of openness to any space.
While they may seem like a feature reserved for cathedrals or castles, vaulted ceilings are actually a popular design element in many modern homes. As more homeowners look for simple ways to enhance their interiors and boost property value, adding beams to a vaulted ceiling has become a more appealing upgrade.
Instead of leaving all that space empty, faux wood beams offer an easy, lightweight, and DIY-friendly way to bring warmth and character overhead. In this guide, we’ll explore beautiful design ideas and share practical tips to help you install them with confidence.
Why Add Faux Beams to a Vaulted Ceiling
Adding faux wood beams to a vaulted ceiling helps bring structure and definition to an otherwise wide-open space. In homes with open-concept layouts, beams can visually separate areas like kitchens, living rooms, and dining spaces without the need for walls.
Beams can also highlight the height and architectural shape of a vaulted ceiling, drawing attention upward while making the space feel more intentional and complete. In larger rooms, they help break up expansive ceiling surfaces so the design doesn’t feel empty or unfinished.
Beyond aesthetics, faux beams offer the look of solid wood without the added weight, cost, or installation complexity, making them a practical choice for both new builds and renovations.
Vaulted Ceiling Design Ideas
Homes with bedrooms, living rooms, dining rooms, and kitchens that feature vaulted ceilings offer a great opportunity for installing faux wood beams. If your home has an open-concept floor plan with vaulted ceilings, faux wood beams are the perfect design feature to tie it all together. Below are a few vaulted ceiling design ideas you can DIY in your own home.
In this kitchen, Hewn Faux Wood Beams in Fresh Coffee create a strong visual line that draws the eye through the length of the space.
The darker finish contrasts with the surrounding surfaces, helping break up the ceiling without disrupting the clean, linear layout.
 Hewn Faux Wood Beams in Fresh Coffee
 Old Barn Faux Wood Beams in Burnished and Rustic Faux Brick Panels in Mountain Gray
In this bedroom, Old Barn Faux Wood Beams in Burnished add contrast against the light ceiling, helping define the space without overwhelming it. Paired with Rustic Faux Brick Panels in Mountain Gray, the beams introduce texture and depth while complementing the room’s natural materials.
The result is a grounded, cohesive design that balances scale and comfort in a space with soaring ceilings.
In this open-concept living and dining area, Old Tuscan Faux Wood Beams in Burnished follow the pitch of the vaulted ceiling, bringing a sense of order to the space. The warm finish contrasts with the light ceiling and ties into the flooring and furnishings below.
The layout helps distinguish each area without interrupting the overall flow, allowing the space to feel connected yet clearly organized.
 Old Tuscan Faux Wood Beams in Burnished
 Magnolia Faux Wood Beams in Misty Harbor
On this covered outdoor patio, Magnolia Faux Wood Beams in Misty Harbor are installed along the vaulted ceiling to shape the space and create a clean, open feel. The lighter, weathered finish stands out against the white ceiling, emphasizing the beam layout and drawing attention overhead.
This pairing works especially well in outdoor settings, where beams add architectural detail and enhance the overall design without competing with the surrounding environment.
In this bedroom, Hewn Faux Wood Beams in Log follow the slope of the vaulted ceiling, adding visual depth without making the space feel heavy. The lighter finish blends with the neutral palette and natural materials, keeping the room bright and introducing subtle texture overhead.
The beam placement complements the ceiling’s angles, resulting in a clean, balanced look.
 Hewn Faux Wood Beams in Log
 Old Barn Faux Wood Beams in Sable
In this kitchen, Old Barn Faux Wood Beams in Sable anchor the vaulted ceiling and complement the central chandelier. The beam placement follows the layout of the space, helping frame the lighting feature and support a clean, balanced look.
The rich finish contrasts with the lighter ceiling, adding depth and creating a more architectural appearance without competing with the overall design.
How to Install Faux Wood Beams on a Vaulted Ceiling: Step-by-Step Guide
Installing faux beams on a vaulted ceiling is far easier than opting for solid wood beams. If you aren’t an expert carpenter, don’t worry about it! The tools needed for installation are simple, and you may already have most of them at home.
Below is an overview of how to install faux beams on a vaulted ceiling. When you’re ready to install, follow our detailed instructions and diagrams.
Before You Get Started
Determine how many beams you need, and how far apart to space your beams. Although there is no wrong answer, beam spacing is typically between two and eight feet apart, while the most common ceiling beam spacing is four feet apart.
If you order unfinished beams, it's recommended to paint or stain them before installation. Always use water-based products to finish the beams.
At least 24 hours before installation, acclimate the beams by storing them flat in the installation location away from moisture, direct sunlight, or other heat sources.
Ensure your installation surface is structurally sound and in good condition. Surfaces such as drywall should be flat and smooth to minimize gaps.
Understanding Ridge vs. Rafter Beams
Vaulted ceilings may include ridge beams, rafter beams, or a combination of both. A ridge beam runs parallel along the peak of the ceiling, while rafter beams run perpendicular to it.
This guide focuses on installing ridge beams, which are typically installed first in a ridge-and-rafter layout. Ridge beams require stacked mounting blocks so fasteners can be properly secured.
Rafter beams install using standard mounting block methods, similar to flat ceiling installations.
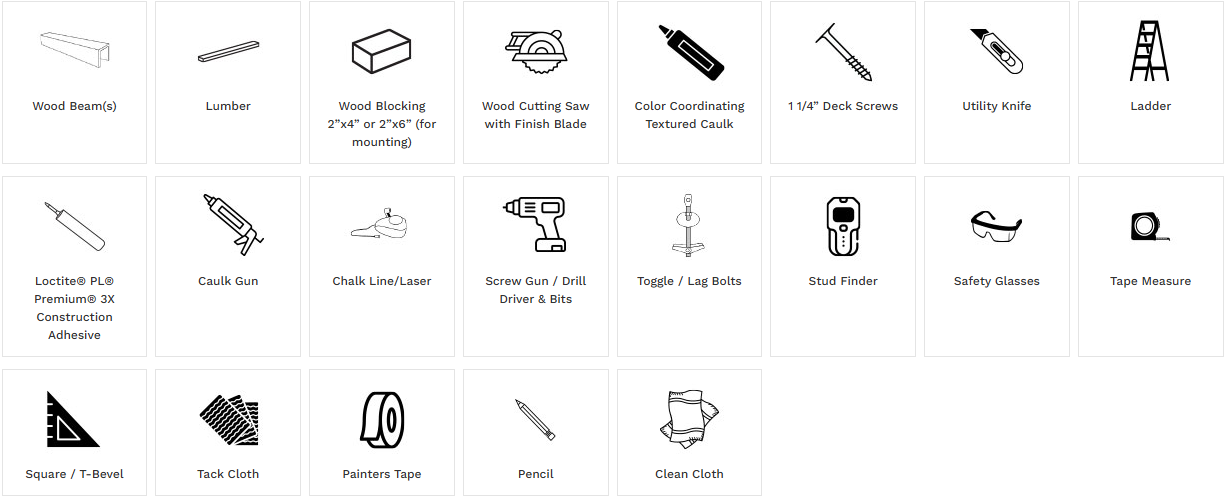
For ridge beam installation, you’ll need the following tools and materials:
- Faux wood beams
- Mounting blocks (wood blocking)
- Construction adhesive
- Deck screws
- Drill/driver
- Saw (for cutting blocks)
- Measuring tape and level
- Stud finder
- Caulk and finishing supplies
Step 1: Determine How Many Mounting Blocks You Need
Mounting blocks will be installed as stacked pairs. To determine how many you need, you’ll add A, B, and C together:
- One pair (2) at each end of the beam
- At least one pair every three feet along the beam
- One pair at the joint where the beams meet (if you’re using more than 1 beam)
Step 2: Cut Mounting Blocks and Drill Pilot Holes
To determine the size of the mounting blocks, measure the inside dimension of the beam and subtract ⅛”.
Then, cut the appropriate number of blocks you calculated in step 1. Make sure your blocks have about ⅛” clearance inside the beams.
Next, drill pilot holes in the mounting blocks. If you’re installing a ridge beam (running along the ceiling peak), offset the holes so the blocks can be stacked. For standard beam runs, drilling pilot holes without offsetting is sufficient.
Step 3: Attach Mounting Blocks to the Ceiling
If installing a ridge beam, attach your first mounting block centered on the ceiling apex and as close to the side wall as possible, then attach the second block directly below it. For standard beam runs, position mounting blocks along your marked layout lines.
Then, mark the location of the rest of your mounting blocks by placing painter's tape on the ceiling every three feet. If you’re using more than one beam in a run, mark where your mounting blocks will go and where the beams will meet.
Step 4: Dry Fit the Beam
Check your beam length by dry-fitting it in place and trimming the beam if needed.
Step 5: Apply Adhesive
Because our beams are made from lightweight high-density polyurethane, you can secure them to the ceiling with a couple of screws and construction adhesive.
To form a tight bond, wipe the edges of the mounting blocks and the inside of the beam to remove debris. Then, apply adhesive to the edges of the mounting blocks that contact the beam.
Step 6: Install Beam
Slide the beam into place over the mounting blocks. Slightly countersink 2 screws per side through the beam and into the mounting block to hold the beam until the adhesive dries. Wipe off any visible adhesive using a clean cloth before it dries.
Step 7: Touch Up
Apply color-complementary textured caulk to fill screw holes. Blend caulk into adjacent surfaces while it is still wet.
Where necessary, apply caulk to joints and gaps. Use paint from the touch-up kit to paint over and blend the caulk.
Caring for Your Vaulted Ceiling Beams
Faux wood beams made from high-density polyurethane are designed to be low-maintenance and long-lasting. In most cases, they only require occasional dusting with a soft cloth to keep them looking clean.
For deeper cleaning, you can use a mild soap and water solution and gently wipe the surface with a soft cloth or sponge. Avoid abrasive cleaners or scrubbing pads, as these can affect the finish.
Compared to solid wood, faux beams do not require staining, sealing, or ongoing treatment. They won’t crack, warp, or split over time due to changes in temperature or humidity, and they are resistant to pests like termites and carpenter ants.
Because they are color-consistent and finished for durability, faux beams maintain their appearance over time without fading or needing refinishing, making them a practical choice for both interior and exterior applications.
Frequently Asked Questions
Chances are, you have the same questions as many other customers do. Check out these frequently asked questions about adding faux wood beams to a vaulted ceiling.
1. How much does it cost to add beams to a vaulted ceiling?
Faux wood beams are a cost-effective alternative to solid wood. The total cost depends on factors like beam size, finish, and installation method. Larger beams will cost more, but they also provide a more realistic wood appearance.
Because faux beams are lightweight, shipping and installation costs are typically lower than those of solid wood, and many homeowners can complete the installation themselves, further reducing overall project costs.
2. Will faux beams make a vaulted ceiling look lower?
The height and width of the beam you choose play a big role in the visual result you’ll get. Larger, wider beams can make a vaulted ceiling look lower, while thinner, smaller beams can make the ceiling of that same room feel higher.
3. Are faux beams suitable for modern vaulted ceilings?
Absolutely! Faux wood beams are suitable for any design. In fact, the warm, rustic vibe of vaulted ceiling beams plays really well against modern touches like bright white furniture, metals, marble, and modern light fixtures.
4. How are faux beams attached to a vaulted ceiling?
Faux beams are attached to a vaulted ceiling using a series of mounting blocks, deck screws, and adhesive. The installation process is DIY friendly and can be done in a matter of hours, with the help of just one other person.
Start Your Vaulted Ceiling Beam Design Today!
 Old Barn Faux Wood Beams in Brunette
AZ Faux offers a wide variety of beam styles and finishes. If you’re starting with a simple arrangement of faux beams on a vaulted ceiling, you have the option of adding a truss design down the road in the same style and finish.
Should you choose to make your vaulted ceiling beams just as functional as they are eye-catching, our 3-sided faux beams are great at concealing electrical wiring and ductwork, further simplifying the addition of lighting, surround sound, HVAC, and more.
Ready to get started? The first step is choosing the best decorative beam for your vaulted ceiling!
View our Faux Wood Truss Systems
Have questions?